Garden
Flowers Crochet Bracelet Tutorial
For a printable Microsoft
Word document, click
here. For a PDF, click
here.
Would you like to make this bracelet? These are
complete instructions. I hope to have
more pictures to illustrate the techniques soon, so check back in the next
couple of months. Let's get started!
Materials
and Tools:
Pearl
(perle) cotton size #5, such as DMC or Anchor, in several flower colors,
including yellow, plus brown for the bird's nest and green for leaves and stems
Beads: size
#6 seed beads in flower colors, size #8 seed beads in green, size 10 or 11 seed
beads in yellow, and 6mm rounds in egg colors (light blue or green, ivory,
pearly pink...)
30 gauge
wire in silver, bronze, gold, or black
Crochet
hook size #2
Needles,
big-eye type (preferably 2, in case one breaks)
Scissors,
sharp, for cutting thread
Pliers,
preferably chain-nose, small (and/or silicone needle puller)
Flush
cutter, for snipping wire
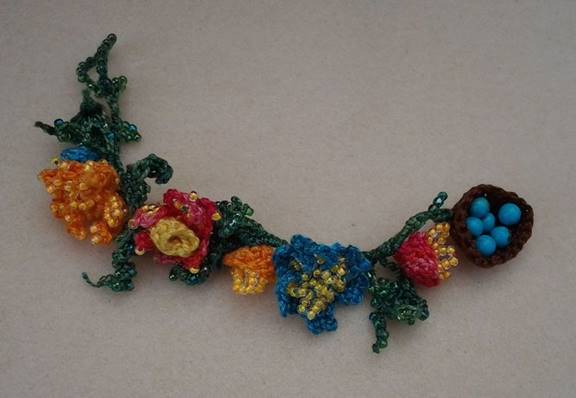
For a full-looking bracelet like this one, you will
need to make 3 flowers, 4 buds, 4 leaf-tendril pieces, and a bird's nest for
the toggle. We will work in that order.
Mix and match types and colors as desired.
Notes:
You will need the pliers or needle puller when
threading small beads, and when weaving in tails. Don't pull harder than you must, or you will
distort your work. Also, take care when
pulling so you don't jab either end of your needle into yourself or anyone
else. In general, pull only a short
distance with force - after that, the hard part should be done and you can pull
gently the rest of the way.
When threading tiny beads, it is useful to flatten the
thread where it comes through the needle, and to pull stubborn ones down the
thread with a silicone needle puller while holding the other end of the needle
with chain-nose pliers.
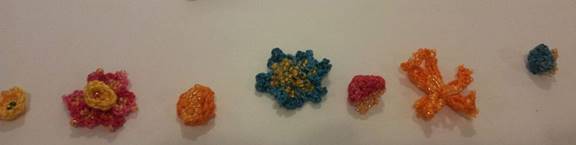
Flowers and buds for the bracelet above, laid out
Flower type
1:
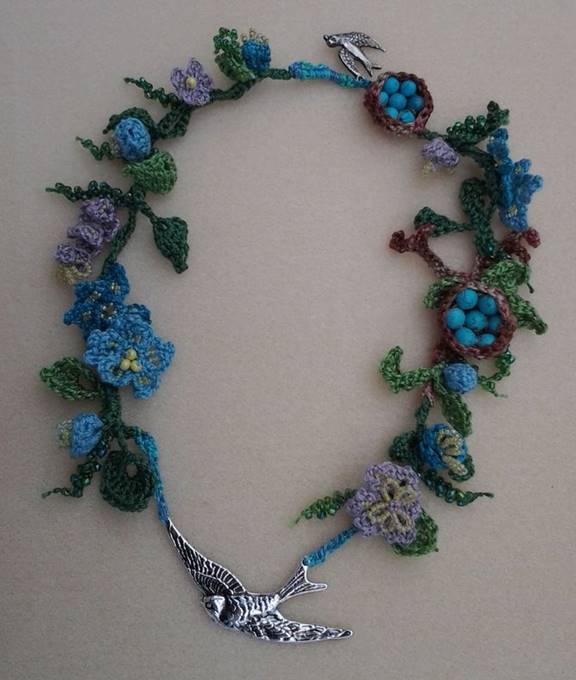
This is the simple flower you see all over the
Internet, and it is also the little purple flower at the top of the bird
necklace at the end of this tutorial.
Easy and quick. Make your slip
knot, chain 4, then slip stitch into the first chain. Double crochet twice into
the same chain, then chain 3 and slip stitch back into the chain to complete
one petal.
Repeat 4 more times.
Yarn over, and pull through the loop on your
hook. Pull your new loop out to 4"
long and cut it at the end. Pull the
thread still connected to the skein out of the loop, and pinch the knot with
your fingernails as you pull it down to the center of your flower.
Now you have a 5-petaled flower with 2 tails of thread
each about 4" long hanging out of its center.
Thread one of these tails into a needle, add a #6
bead, and sew the end into the center of the flower. Repeat 2 times. Tie the 2 tails together in a surgeon's knot. Weave each tail into the flower near the
base, in a U pattern, which will make them hard to pull out. (Weave 1/4" in one direction, then back
the other way 1/4".) Cut the ends
close to the flower without cutting into the stitches.
Flower type
2:
This is the third one in the picture above, the orange
one. Make your slip knot and chain
12. Turn back and slip stitch into the
3rd chain from the hook. This is the tip
of the petal. Single crochet into the
next chain. Double crochet into the next
chain, skip a chain, then double crochet into the next one. Treble crochet into the next chain. Double crochet into the next chain, skip a
chain, and double crochet into the next chain.
Then single crochet into the next chain.
You should now be at the beginning of the chain. Slip stitch into that first chain. Your first petal is complete.
Repeat the above 4 more times, more if you like. There is no center hole for this flower. Instead, when you get back to the middle,
slip stitch around it to connect the petals tightly to the center.
If desired, you can start with 45 #8 yellow
beads. As you begin each single or
double crochet stitch, slide a bead up to the hook, and continue the
stitch. Note that the beads will sit on
the back of the work. Decide where you
want these - on the fronts or backs of the petals - before adding the center
beads in the next step. Remember, the
petals will twist a bit and the flower will cup a little, so the backs of the
petals will be seen as much as their fronts in your finished piece.
Once your petals are done, yarn over and pull through,
making the loop about 6" long. Pull
out the thread still connected to the skein.
Tie the two tails together at the center of your flower with a surgeon's
knot, finishing it on the inside of your flower. Thread 9 #8 yellow beads onto the long tail,
fold them into a loop, then tie the two tails together twice to secure the
beads. Repeat this step twice. Weave in your tails as for Flower type 1
above.
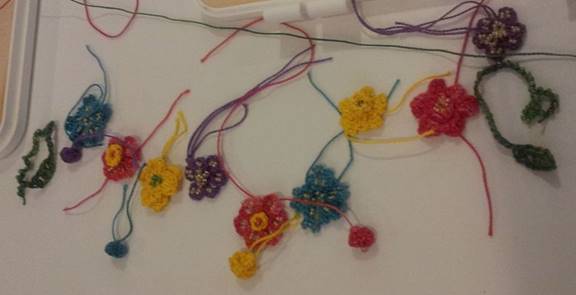
Elements for a necklace
Flower type
3:
This is similar to the red one at the center of the
picture above. Thread 25 #8 yellow beads
onto your flower-colored thread. Make
your slip knot, then slide 5 beads down toward your hook. Fold into a loop and slip stitch. Now slide another 4 beads down to your hook
and slip stitch again. You now have two
loops of beads. Working with your loop
of four beads, chain 4, then single crochet in the center, between the second
and third bead. Chain 3, then single
crochet into the same spot. This is a
picot, which will put a little point on your petal. Chain 4, then single crochet below the fourth
bead, at the bottom of the petal. Now
connect the petal to the center by making a single crochet after the first bead
in your loop of 5.
Repeat the process 4 times. You will end up with a 5-petaled flower with
a large hole in the center. You can fill
that space either with a large bead (sewn in as for Flower Type 1 above), or
with a small yellow cup (like the red one in the picture), which can have a #6
bead sewn into its center. Weave in your
tails as for Flower type 1.
Flower
center cup:
Make your slip knot in yellow thread, then chain
3. Single crochet 8-10 times into the
first chain, then slip stitch into the top edge of the first stitch (which is
really the third chain you made at the beginning). This will fold the circle you are making into
a cup. Yarn over and pull through,
making your loop about 4" long, and cut at the end. Pull out the thread still attached to the
skein, then pull the knot tight. Thread
your needle onto this tail and weave it down to the base. Tie your two tails together with a surgeon's
knot, making sure not to pull too tight, which will warp your cup. Now you can sew in a center bead in the same
way as for Flower Type 1 above. Note:
you could also make the cup with an adjustable "magic" ring,
described below under "Buds".
Thread one tail onto a needle, then into one side of
the center of the flower (not in the center hole) and pull it through to the
back of the flower. Do the same with the
other tail. Tie the two tails together
first with an overhand, then with a surgeon's knot.
Buds:
Make a slipknot, take out the hook, and pull the loop
a bit larger than usual. (This is called a magic or adjustable ring.) Make 8-10 double crochet stitches into the
ring, connect to the first with a slip stitch, then pull the tail to tighten
the base circle. You will have a cup
shape.
Pull out the thread still attached to the skein, then
pull the knot tight, leaving a tail about 6" long. Thread the needle on that tail and weave it
down to the bottom center - leave the needle on. String 9-13 tiny yellow seed beads onto the
thread, take it through a loop at the bottom of the cup and tie it tight. The number of beads you use will be determined
by the height of the cup. You need a
loop of beads just longer that the height of the cup. Do this 2 more times so you end up with 3
loops of beads.
Now turn the cup inside out to reveal a bud with
stamens peeking out. Make 4 of these in
various colors. You might try making
three in the same colors as the three flowers you made above, plus one more in
yellow thread.
Leaf-tendrils:
These are really fun, and tend more toward
free-form. Here are a few different
types of leaves to try. There are lots
more leaf patterns on the Internet as well.
Using green thread and a needle, thread about 75 #8 green beads in
preparation to work your 4 leaf-tendrils.
When working tendrils, vary the number of beads used just a bit so they
won't all be the same length.
Leaf-tendril
type 1:
Work a leaf in the same way as a petal for Flower type
2 above. Optionally, work a second
leaf. Now you are left with a tail, plus
the working thread, in the same spot.
Make several chains using both threads, which will weave
in the tail automatically. Continue with
the working thread, sliding a single bead all the way to the hook before making
a slip stitch around it. Do this another
15 or so times, then pull a loop about 3" long and cut. Tie the tail around itself to make a better
ending knot. Cut the remaining tail to
about 1/8".
You will notice this beaded chain will curl a little
counter-clockwise if you are right-handed, and clockwise if you are
left-handed. Holding the leaf end of the
beaded chain with one hand, and the very end with the other, twist the beaded
part very tightly in the direction it is already curling. When you let go, you will have a nice twist
that will last very well. If it ever
untwists, twist it up again.
Leaf-tendril
type 2:
Make your starting slip knot about 12" into the
thread so you have this extra-long tail.
Work a leaf in the same way as for Leaf-tendril type 1 above, but at the
end, chain 2, then work back down the leaf, matching the stitches on the other
side of your center rib. These should be
a single, a double, skip a stitch, double, treble, double, skip a stitch,
double, then single, chain 2, and slip stitch at the end.
Chain one more and pull a long loop to cut your tail. Pull
out the thread still attached to the skein, then pull the knot tight. Weave the
tail down the center of the leaf like a rib.
Make a tendril of beaded chain from the 12" tail as in Leaf-tendril
type 1 above.
Alternatively, you could start with a regular tail,
work your leaf, then single crochet on the surface of the work, down the
center, to form a rib. This is more
difficult, but gives an interesting result and will leave your working thread
at the base of the leaf, ready to make the tendril.
Leaf-tendril
type 3:
Make a leaf from 5 loops of chain. To do this, chain 7 and slip together, then
repeat.
Chain 9, then slip at a point 2 chains down from the
beginning of this chain. Chain 7 and
slip back at the same point. Chain 7 and
slip back in the same spot again.
You are now at the end of the leaf, but you need to be
at it's base. To get there, slip stitch
around the center a few times, moving toward the base. Once there, weave in your tail and make your
tendril as in Leaf-tendril type 1 above.

You can see several types of leaf-tendril in this
necklace.
Leaf-tendril
type 4:
This is the one at the top right of the necklace
above. Make your starting slip knot and
chain 3. Single crochet into the first
chain twice, then double crochet twice, then treble crochet into the same
hole.
Make a picot (chain 3, then slip stitch into the first
of these chains). This makes the point
of the leaf.
Work two double crochets, then two single crochets
into the same hole, then chain 2 and slip stitch into it. Weave in your tail and make your tendril as
above.
Note: The base hole may be a bit large, like the one
in the picture. You can leave it (it
really is decorative), but you could also fill it with a 6mm green bead. (After making the leaf, give yourself a
12" working tail and cut it, thread the needle and string the large bead
on it, and pull it through the center stitch of the leaf, which is the treble
crochet. Then weave the end back around
the hole to the base. Pull a loop through and put your hook in it. Continue with your tendril.) Or you can start with a magic ring so there
is no large hole left in the center.
Leaf-tendril
type 5:
This is similar to a petal for Flower type 3
above. Make your slip knot, then slide 9
beads up to the hook and slip stitch into the slip knot. Now chain 4, then single crochet into the
center after the 3rd bead. Repeat two
times, which should bring you back to the base of your leaf. Weave in your tail and make your tendril as
in Leaf-tendril type 1 above.
Bird's Nest
Toggle:
This is best accomplished with 30 gauge wire so the
structure will hold its shape and work as a toggle. Cut a piece of wire 12" long. Thread a 6mm round bead onto it and bend the
wire, then thread another three 6mm beads on.
Thread the wire back into the first bead, then add 3 more, and go back
through the center bead. You will have a
center bead with 6 beads around it. Now
position the 6 beads a little above the center bead, and thread the wire
through all 6, then back through the first of these 6. This will give you a single center bead below
a more solid ring of 6 beads. Go through
this outer ring once more, then wrap the wire around itself between two beads 4
times, then put it through the next bead.
Cut the tail off flush, then repeat the wrapping, threading through one
bead, and cutting with the second tail.
You now have a good solid base of "eggs" for your nest.
Leaving a 10" tail, make an adjustable ring and
double crochet into it 12 times, slip closed, then pull the center ring closed
by pulling on the tail. For the second
row, chain 3, then double crochet into every stitch, increasing as needed to
fit around the bottom of the "egg" construction. Keep fitting the eggs in as you go, comparing
and increasing here and there (try making two doubles into every third
stitch). Slip closed, and make a third
row, again fitting and comparing the eggs as you go. This is sort of free-form again.
Slip the third row closed, pull the loop long so you
won't lose the stitch, pull out the hook, and put your eggs in again. They should fit inside and be at or just
below the top of the nest. Thread the
needle onto your 10" tail, and use it to tie the eggs down firmly into the
nest. To do this, take the thread up
through the center and around each wire between two beads, then back down
through the bottom, catching at least one loop of thread, then repeat with all
the other wired spaces. This method also
hides the wires. When that's done, tie
it off with a surgeon's knot, weave it through the bottom a bit, then pull the
remaining thread up inside the nest, on the outside edge of the beads, and cut
it off maybe 1/2" long or a little less.
It should be hidden when the nest is done.
Now put your hook back into that long working loop and
pull it back to normal again so you can work the last row. Chain 2, and single crochet all around the
top, working only one stitch into each stitch of the third row, and skipping
every third stitch or so. This will
tighten the stitching around the eggs and hold them in even better.
If the nest won't be high enough to go over the eggs,
you can use double crochets instead of singles, or make two rows of singles
instead of one. Slip closed, tie off,
and weave your tail back all the way to the bottom, then pull the remaining
thread up and cut as you did with the first one.
Alternate
Flower Toggle:
You can see this type in the necklace shown
above. Construct the central flower the
same way as the egg structure for a bird's nest, but position all the beads to
lay flat.
Using a needle or your hook, pull a loop of thread
under one of the wires between two beads and catch it on the other side,
working in your tail as you chain 5, then single crochet around the next wire
between beads. This will be a tight fit
but hides the wire. Repeat until all the
beads have been crocheted around. Tie
off and weave your ending tail into the chains you just made so the thickness of
chain on either side is similar. When
crocheting the piece together below, thread a needle and wrap the thread twice
around one of the wires between beads, then back through, leaving a loop for
your hook. Remove the needle, place the
hook in the loop, and pull it to normal size.
Note that this loop replaces the usual slip knot loop that you typically
begin a crochet piece with. Continue as
below.
Putting it
all together:
Lay out your flowers with some space between
them. Place a bud and leaf-tendril at
the beginning, between each flower, and at the end. I like to place each bud between two flowers
of different colors, but this is totally up to you. Place the nest at one end and rearrange
elements until you like the result.
Determine how long your bracelet needs to be to fit
your wrist, and remember the width of the bird's nest will be the width of the
toggle, so use it only once when measuring and don't count it twice. Also remember the elements will hang
vertically, not taking up much room on the chain. Count flowers and buds, but not
leaf-tendrils, because they will be in the same places as the buds. Decide how much room you need between
elements and how many chains that will be.
This sounds complicated, but the way it works out, you will probably
need only 3-5 chains between elements.
If you need more space, you can add beaded loops to take up some of the
space as well. If you have a very large
wrist, make an extra flower, bud, and leaf-tendril. A set of flower, bud, leaf-tendril and bead
loop (see below) will measure 3/4" to 1" depending on how loosely you
stitch if you make 3 chains in between them.
More chains will make your piece longer.
Measure your chains and count each element as one chain. Try using 3 chains the first time you make a
bracelet, and adjust it at the end. Next
time you will know whether to add or subtract chains. Or to make it a lot larger (1/4" or more
each time), add a bead loop and 3 extra chains between each bud and flower.
Thread 60 or more #8 green beads onto your green
working thread. With the needle still on
the thread, pull it through the back of the bird's nest, not at the center, but
about 1/4" down from the top. Take
the thread around a couple of times in that spot, then back through, leaving a
loop for your hook. Remove the needle,
place the hook in the loop, and pull it to normal size. Note that this loop replaces the usual slip
knot loop that you typically begin a crochet piece with.
Chain 3, slide 5 beads to the hook, then slip stitch
into the last chain to form a bead loop, working in your tail as you go. (The tail does not have to go through the
beads, just crochet your chains with the tail until it is gone.)
Chain 3, then pick up the first leaf-tendril by making
a single crochet around the stem where it goes from chain to tendril. Then pick up a bud by slipping your hook
through a loop on its surface, not at the base, but a little way up from it,
and working a single crochet to attach it.
Chain 3 and pick up a flower, again not at the center but higher up,
making sure the green thread doesn't show on the front of your flower. Where you pick up the elements will determine
how they lie or hang on the finished piece.
Your chains are actually being worked on the back of the piece, so look
at it from the front from time to time.
Repeat the process until you have incorporated all the
elements. Throughout this process,
periodically stop and check your length.
If it seems too long, make fewer chains, more if it is too short.
At the end, you must make a loop to go over the bird's
nest or wired flower as a toggle closure.
To do this, after your last bead loop and 3 chains, slide a bead to the
hook and slip stitch over it. Continue,
making a beaded chain until it measures the same as the width of your nest or
flower. Slip stitch into the chain
before the beads to make a loop and single crochet a couple of times over the
chains at that spot. Pull your working
thread loop long, remove the hook, and test the fit of the loop and nest. This should be fairly tight, as it will
loosen over time as the thread stretches.
Also try it on. If your bracelet
is too long at this point, frog it (pull the stitches out) back as far as you
must and re-do the end, maybe eliminating the last loop of 5 beads before the
toggle, which will make it about 1/2" shorter. Once your fit and toggle are right, tie off,
cut a 2" tail, and weave it in.
Congratulations
- your bracelet is done!
Once you have tried this piece, experiment. Try multi-level flowers, make a necklace,
incorporate larger beads. Miniaturize
any shape you find or work out a pattern for and put it in. For inspiration, type "freeform
crochet" into Google and click "Images". Then go nuts.
Have fun!
Tip:
Often a big-eye needle will break at one end, actually
splitting from being pulled through a really tight spot one too many
times. If this happens, which it will
eventually, it is still useful for helping you add beads that were not threaded
on before you started. This is great for
spontaneous work. Just thread your
broken needle into the working loop and pull the thread out a bit, place both
open ends of the needle inside the bead, and pull the needle through so the
thread comes out of the bead with just enough space left for your hook. Put your hook in, remove the needle, and keep
going! If you don't have a broken
needle, use a 4" length of 30 gauge wire, folded in half, which is almost
as good.
A little inspiration :)